Updated April 5, 2020
Now that I have milled or located good chair wood it’s time to start building the chair. The first step is to mill the blank parts out of the sawn lumber. This is more than simply cutting parts to size. Each board is evaluated to determine it’s suitability for various parts. And each part is laid out for optimal end grain orientation. I use rift sawn boards for rear legs and quarter sawn boards for slats.
Here are two heavy 9/4 (about 2-3/8″ thick) soft maple boards. The top board has nice rift sawn grain and is about 15″ wide at it’s narrowest point, enough to get 3 pairs of rear legs. The bottom board, about 18″ wide at it’s narrowest point, has wide areas of quarter sawn end grain on both sides that will be perfect for slats. If I only had the bottom board, I could also get a pair of rear legs from it—the slat blanks need about a 5″ width of quarter sawn end grain, and to the inside of this there is enough rift sawn end grain for a pair of rear legs. Since I have both boards I’ll simply take the rear legs out of the top, rift sawn board and the slats out of the bottom, quarter sawn board. Front legs and rungs have less demanding requirements and will be cut after the rear legs and slats from the wood that remains.
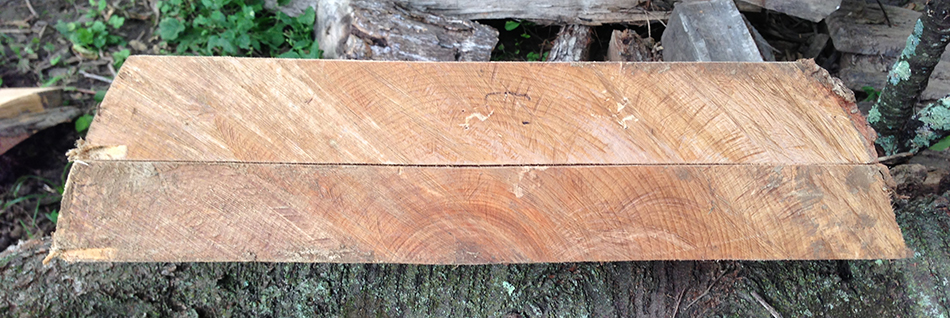
First, I check the moisture content of the boards. For parts that will be bent (rear legs and slats) the ideal range of moisture content is from 12% to 20%. It’s possible to bend wood with a higher moisture content, but you must compensate for additional shrinkage as the wood dries by increasing the thickness of the blank. And, if the moisture content is too low there are ways to increase it before steaming. The moisture content of these two boards is about 18% which is perfect for steam bending. Front legs and rungs will not be bent so a lower moisture content is better. For those parts I sticker and stack them in the shop and let them acclimate to the interior environment. After that I may also put them in a small kiln to get them down to final moisture content which in my shop is about 8%.
For rear legs the goal is a bending blank with these specifications: 4ʹ long, rift sawn end grain, very straight long grain, and no defects. I start by laying out the cuts for the rear legs on the rift sawn board. This board is remarkably free of knots and other defects and has very straight long grain running parallel to the bark edge. It does have a large dark stain running vertically down the center that I will not be able to use. There is also some light gray staining across the width of the board in the center—the shed where I stacked this lumber leaks and the board got wet causing the stain. Fortunately the light staining is only on the surface so I’ll be able to remove it in the milling process. This board is roughly 6ʹ long. As you can see it flairs dramatically toward the butt end so I’ll take the rear leg blanks out of the top end which is straighter. First I layout a horizontal line 4ʹ from the top—this is where I will cross cut the board in two. The 2ʹ long section at the bottom will be used for front legs and rungs. The straightest grain runs parallel to the bark edge so I draw a reference line as close to, and parallel to the bark edge. For species with sap wood that differs in color from the heartwood, such as walnut or cherry, I draw the reference line parallel to the bark edge at the point where the sapwood ends and the heartwood begins. Next I layout out lines parallel to and about 2-1/4″ away from the reference line for each blank. On this board I will get 3 legs on either side of center as shown here. I was very lucky to avoid the stain in the center, but even if this board had no stain or defect in the center I would still lay out the blanks the same way.

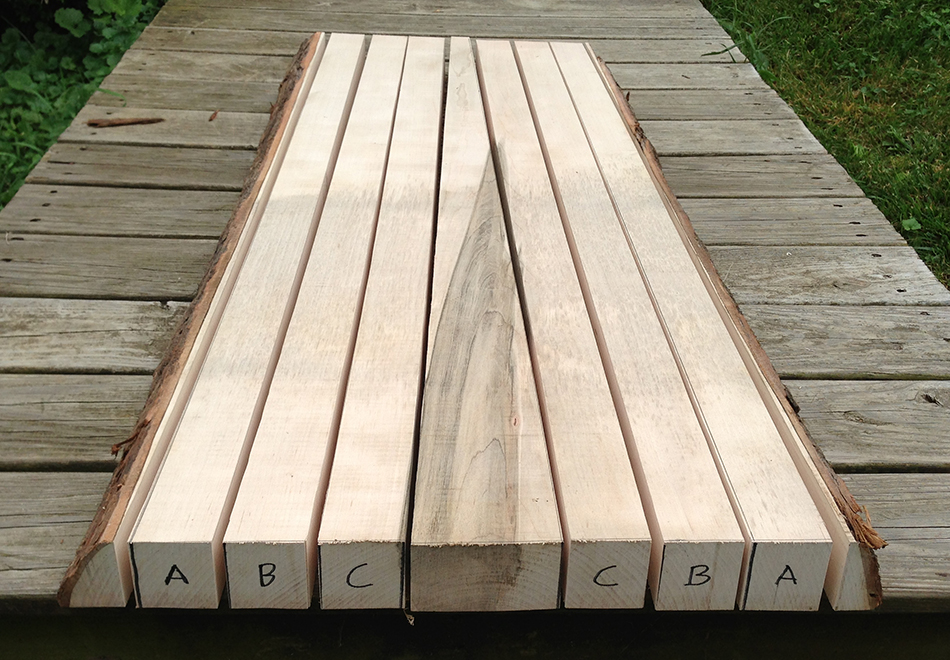
Here is a shot of the same board after cross cutting to 4ʹ in length. The safest way for me cross cut a board of this size is with a jig saw. You can clearly see the rift sawn end grain in each blank. Rift sawn end grain has growth rings that are 45° or less. If the end grain in the blank is greater than 45°, as is the case with the two outermost pieces, I will simply rotate the blanks 90° before final milling so that the growth rings are less than 45°. The two outermost blanks make up a pair since the end grain in each will mirror each other in the final chair. The same goes for each succeeding pair of blanks. I have labeled the pairs in the bottom photo.
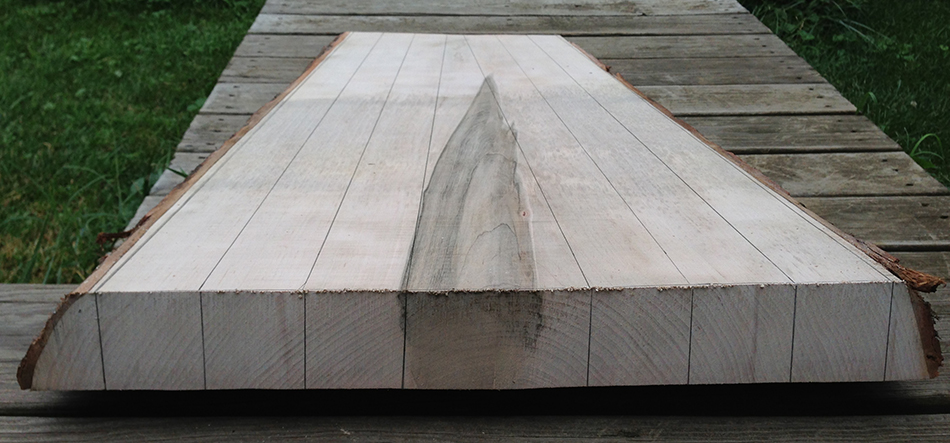
I do the balance of the milling on the bandsaw. First I freehand cut along both layout lines in the center of the board, mainly so I can work with smaller, more manageable pieces. Next I edge joint the freehand cuts, set up the bandsaw fence for 2-1/4″, and rip cut the remaining blanks. The fully milled board is below. Because I cut parallel to the bark edge, the long grain is as straight as possible. What’s left is the bark edge, which ends up in my woodstove, and the wedge shaped piece in the center. Often the wedge in center can be used for front legs and rungs, but in this case the stain limits what I can do with this piece. There may some clear wood on the reverse side for a rung or two.
In the next post I’ll go over milling blanks for slats, front legs and rungs. Slats are best cut from quarter sawn wood. After milling the rear legs and slats there is usually enough wood left over for front legs and rungs which are easier to find because those parts are relatively short and don’t require a specific grain orientation out of the board.
Side Chair Build Series Links:
Next Post: Milling Blank Parts, Part 2 — Slats, Front Legs, and Rungs
Previous Post: Logs and Lumber