
Hand shaping the front and rear legs is by far my favorite part of building these chairs. It is very pleasant, quiet, dust-free, and satisfying work. Using only a few simple hand tools I can take square or bent blanks and transform them into beautifully shaped legs that will only require a minimum of sanding prior to applying a finish. The tool kit includes a drawknife for initial stock removal as well as end grain finish cuts, a flat bottom spokeshave for flat and convex cuts, a round bottom spokeshave for concave cuts, and a card scraper for final surface shaping and removal of any tear-out. For an excellent introduction in how to use and sharpen chairmaking tools I highly recommend this DVD by Brian and available and here: Drawknives, Spokeshaves and Travishers: A Chairmaker’s Toolkit.
Drawknives
There are lots of drawknives available, from antique knives that you can find in flea markets or on eBay to excellent knives made by contemporary tool makers. Good antique brands to look for include P. S. & W., Swan, Ohio Tool, D.R. Barton, White, Witherby, Fulton, and Jennings. I’m sure there are others. The only contemporary knife I own is made by Lie-Nielsen — this knife is based on an antique Witherby and was developed by Lie-Nielsen in collaboration with Jennie Alexander (of Make a Chair from a Tree fame) and Brian Boggs. If you want a knife that requires a minimum of set-up right out of the box you can’t go wrong with the Lie-Nielsen. There are many other brands of contemporary drawknives, but not having used any, I can’t comment on them.
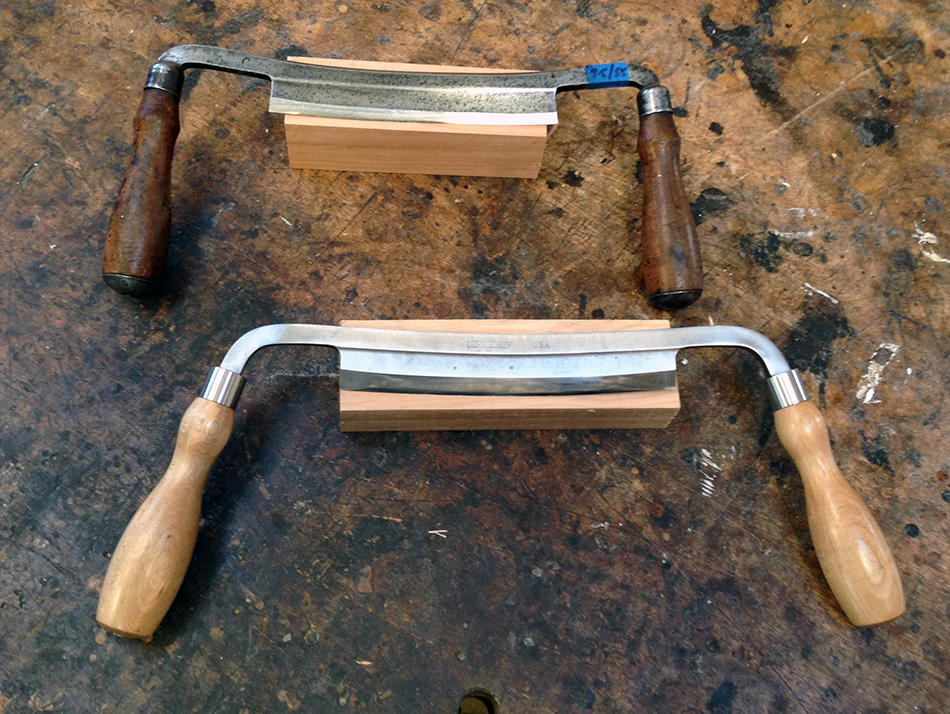
Here are examples of an antique 6″ Witherby, top, and a 7″ Lie-Nielsen with a curved blade, bottom. The Lie-Nielsen is also available with a straight blade.
When looking for an antique drawknife consider the following:
- Width of blade. Blades range in size from 6″ up to 12″ or more. My favorite is 6″ but they can be hard to find. 8″ wide blades are very common and make excellent tools.
- Curved or straight blade. Most drawknives I’ve seen have some curve to the blade, often in more than one plane, but there are also some with straight blades. In use, I don’t think there’s any functional difference between a curved versus straight blade. A straight blade may be easier to sharpen depending on your sharpening method.
- Condition of the handles. Look for handles that are in good condition and fit tightly, unless you’re up for replacing them.
- Condition of the blade. Look for blades that are as clean as possible. Light rust is OK and can be removed when sharpening, but avoid any serious pitting, especially if it is close to the cutting edge.
- Bevel up or down. Drawknives tend to work better either in a bevel up position or in a bevel down position. The optimal position of any knife is determined by the relationship of angle of the handles relative to the angle of the back of the blade. In most old knives you can bend the handles to change or improve this relationship.
Bevel up or bevel down?
There are as many opinions on whether to use a drawknife bevel up or bevel down as there are chairmakers. I will talk briefly about general principles and my own preferences. You will have to make your decision on this issue based on your knife, the kind of work you do, and what works best for you. In general I prefer to use the drawknife bevel up for flat and convex cuts and bevel down for concave cuts. The majority of the cuts in this side chair are flat or convex, so I use the knife bevel up most of the time. For flat cuts with the blade bevel up, the back of the blade is almost in full contact with the wood as shown in the photo below on the left. In this position the force is behind the blade giving me controlled power and making it easier to cut in a straight line. In the bevel down position with the bevel flat on the wood as shown in the photo on the right, the back of the blade is quite a distance off the surface of the wood. In this case the force at the back of the blade is higher with a resulting tendency to pull inward. It’s certainly possible to use the blade bevel down to make straight cuts, but my strong preference is to use the drawknife bevel up for flat work. In concave areas a bevel up knife will not be able to make a clean cut. So for concave work I always use the knife bevel down. This allows the knife to enter a concave area and make a smooth cut all the way through.
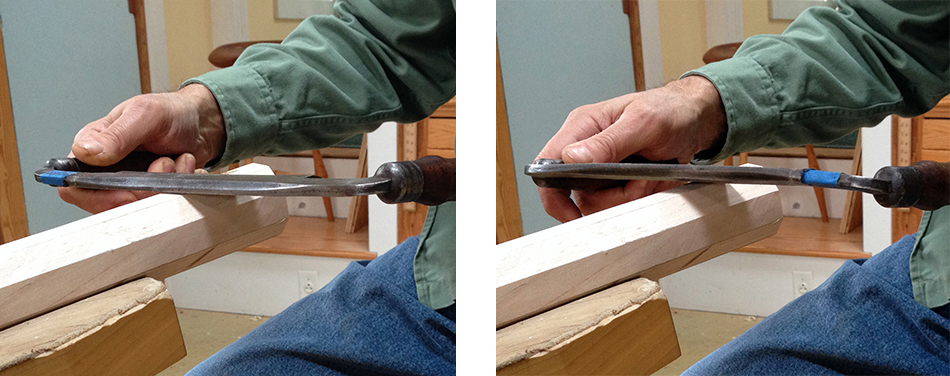
As I mentioned, the question of whether a drawknife is primarily bevel up or primarily bevel down is a result of the relationship between the angle of the handles and the back of the blade. In these photos I have clamped the back of each drawknife to a straight stick of wood so that you can clearly see this relationship. The stick of wood is essentially an extension of the back of blade making it easier to compare the angle of the back of the blade with the angle of the handles. As you can see, in the Witherby on the left, the handles cant backward compared the back of the blade. This knife actually works pretty well in both bevel up and bevel down positions, but I use it primarily as a bevel up. On the right, in the Lie-Nielsen, the handles are essentially parallel to the back of the blade. This knife is definitely better in the bevel down position. Lie-Nielsen says that you can bend the handles to your desired position, but recommends that you do so only once.

Here is the Witherby in use: bevel up on the left and bevel down on the right. In both cases this is a pretty comfortable positions for my hands and wrists.
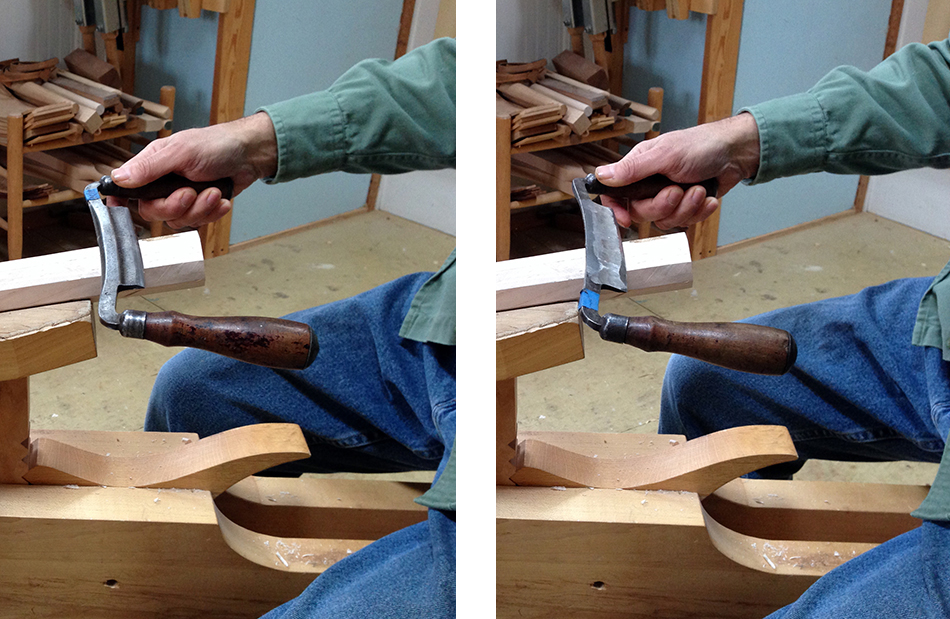
And here is the Lie-Nielsen. In the bevel up position, on the left, you can see the awkward position of my wrist. However, in the bevel down position, on the right, my wrists are in a much more comfortable position. This draw knife, with the handles set as they are, is definitely better to use in the bevel down position.

Drawknife blade geometry
For a drawknife that will be used exclusively bevel down, a flat bevel and a completely flat back will work. If you ever expect to use the knife with the bevel up, a completely flat back will tend to dig into the wood rather than let you make a smooth entry into and out of a cut. So, for a drawknife that will be used bevel up, even just occasionally, the leading edge of the back needs to fall off slightly or be slightly rounded over. When asked how to sharpen a drawknife by students, Brian usually suggests a flat bevel and a flat back, assuming that most students will be unable to get a truly flat back and that it will fall off naturally or be slightly rounded over. The Lie-Nielsen drawknife comes with a very flat back and I have seen students struggle with using this knife bevel up until they round over the back with a light honing or stropping. Brian prefers for the back to fall off slightly over a wide area — say a .010″ fall off over 3/8″ — because it provides better support for the knife. A slightly rounded back edge will also work and can easily be achieved with a light stropping on a leather strop (see the end of Curtis Buchanan’s Part 2 Drawknife Sharpening video).

Sharpening a drawknife
Drawknives can be a challenge to sharpen with their long, curved blades. Here are several video references that talk about and demonstrate how to sharpen a drawknife.
- Brian demonstrates how to sharpen a drawknife using stones
- Curtis Buchanan has a very detailed two-part video detailing how to hollow grind the back and the bevel and sharpen with stones. Part 1. Part 2.
Pete Galbert has developed an alternative to the traditional methods of sharpening a drawknife using a tool of his own design, called the Drawsharp. The Drawsharp uses the back edge of the knife as a reference which makes it much easier to consistently and repeatably hone the bevel and the back. Using this tool will naturally put a micro-bevel on the back of the blade which makes it ideal for bevel up knives and works fine for bevel down knives. The Drawsharp is so effective it is now possible for anyone to take most antique knives in decent condition and sharpen them into a good working drawknife. Here is Pete talking about and demonstrating the Drawsharp. You can buy the Drawsharp, pictured below, here, here, and here.

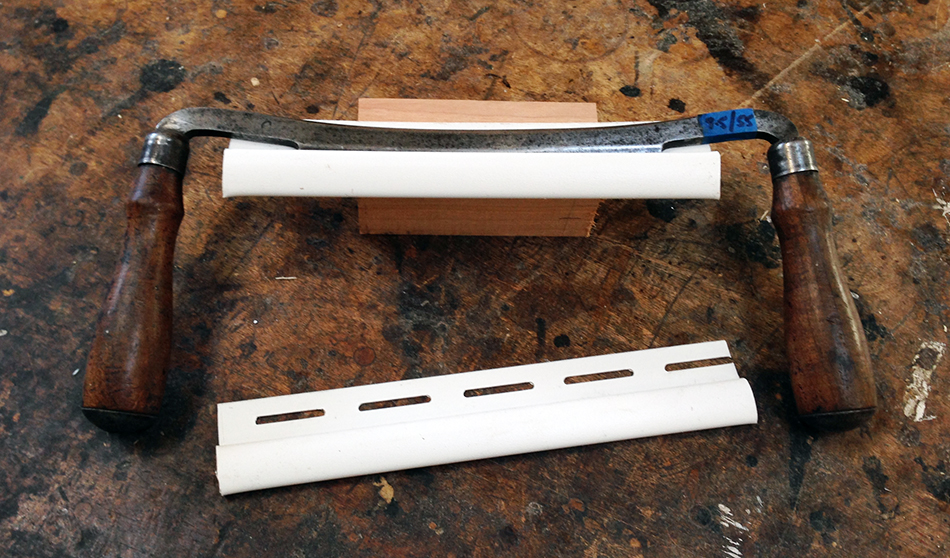
One last thing on drawknives. I use a small piece of plastic as a blade guard. It is called Vinyl Finish Trim and can be found at lumber yards and big box stores. I believe it is used for trim around windows on exterior walls that have vinyl siding. It is very cheap (about $6 for 12 feet) and easy to slip on and off. Here’s my Witherby drawknife with the finish trim used as a guard. Thanks to Curtis Buchanan for this idea.
Spokeshaves
My favorite spokeshaves are the ones Brian has designed for Lie-Nielsen. I use the flat bottom shave for flat and convex work and the round bottom shave for concave work. Brian talks about the design of these shaves and demonstrates how to use them on the DVD Drawknives, Spokeshaves and Travishers: A Chairmaker’s Toolkit, available here. Both shaves use the same straight blade and are sharpened in exactly the same way. If you can only afford one spokeshave buy the round bottom — it is designed for concave work, but can also be used on flat and convex work. The flat bottom shave is better at flat and convex cuts, but cannot be used to make concave cuts. Here you can see the difference between the sole of the flat bottom (top) compared to the sole of the round bottom (bottom).

Here’s another view of the two shaves. The flat bottom, with a completely flat sole, is on the left. The round bottom, on the right, has a sole with a radius of about 5″.

Another option is to refurbish an old spokeshave. Brian wrote an excellent article for Fine Woodworking on taking a standard metal body, flat bottom spokeshave, such as the Record 151 and fine tuning it into a great working shave. The directions also work for the Stanley 151, which is a commonly available older shave, and other metal body shaves as well. The article, Soup Up Your Spokeshave, is from the September/October 2002 issue of Fine Woodworking. If you are a member of Fine Woodworking on-line you can download the article here. You can also find a related video, also members only, about using the souped up spokeshave here.
Sharpening a spokeshave
The stock blade in the Boggs shave comes ground with a 25° bevel. Brian prefers honing a 35° micro-bevel for a stronger edge. The shave is designed with the blade bedded at 40° relative to the sole. The blade is set in the shave bevel down and, combined with the bed angle, the 35° micro-bevel still leaves a 5° clearance angle.
So the question is what is the best way to hone the 35° micro-bevel. If you are comfortable with hollow grinding one option is to hollow grind a 35° bevel and then hand hone the bevel. The only issue with this is that you will lose a lot of blade grinding a 35° hollow grind on a blade with a 25° primary bevel.
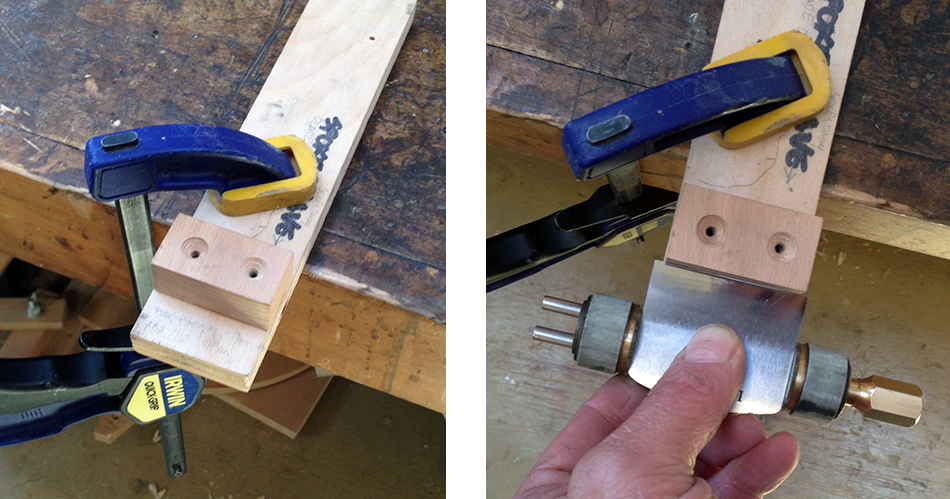
Another option, and the one I prefer, is to hone a 35° micro-bevel, but leave the primary bevel at 25°. For me the easiest and best way to do this is with a honing guide, and the one that I find works really well is the Kell Honing Guide (available here, and many other places). I use the larger model which can hold blades up to 2-5/8″ wide. This is the only honing guide that I’ve found that can firmly hold a short blade like this. It is also really good at keeping the edge square to the sides of the blade. The guide has two horizontal bars that the blade rests against. The instructions that come with the guide suggest that the blade be clamped below the horizontal bars, with the bevel angle being controlled by the distance that the blade projects beyond the bar. I prefer to have the blade above the bars. To consistently set the bevel angle I use a simple set-up block. To make the block, I first set the blade in the guide, on top of the bars, and got it as close to a 35° bevel as I could. Using the distance that the blade projects beyond the horizontal bar I next made the small set-up block, shown below on the left, that allows me to consistently set the blade to the same distance from the bars, and consequently the same bevel angle. It may not be exactly 35°, but it is definitely very close, and in any case it is always the same. On the right I am using the set-up block to register the blade in the honing guide. The horizontal bar on the guide contacts the lower front edge of the set-up block, and the blade contacts the block on top. The set-up block is a bit narrower than the blade which allows it to fit between the rollers.
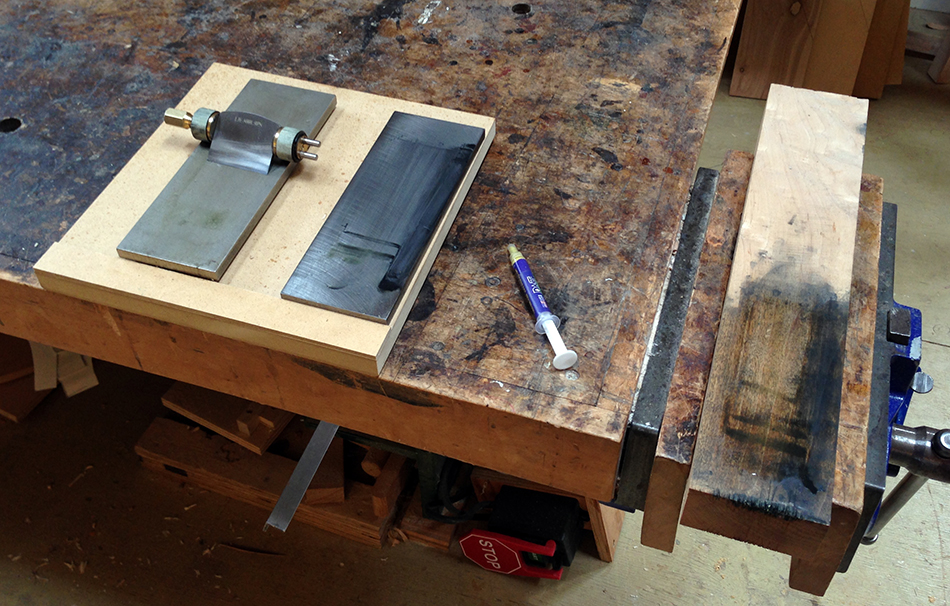
To hone I use the simple set-up shown below. I begin with the 600 grit diamond stone on the left and hone the bevel until I have a small burr on the back. This usually only takes a few strokes. Next I move to a steel honing plate that is charged with 3 micron diamond paste and lubricated with oil to hone the bevel and remove the burr. You could also use an Arkansas stone charged with the diamond paste. Another nice thing about the Kell honing guide is that I can hone the back of the blade without removing it from the guide. Once I have honed the micro-bevel and removed the burr I move to a hard maple block also charged with 3 micron diamond paste and lubricated with oil, and again polish the bevel and the back. Because the maple block is softer than the steel the larger particles of the diamond paste tend to get pushed into the wood, leaving the very finest particles on the surface, resulting in a finer polish. The very last step is to take the edge of the blade and draw it through the front corner of the end grain of the maple block. This removes any remaining vestiges of the burr.
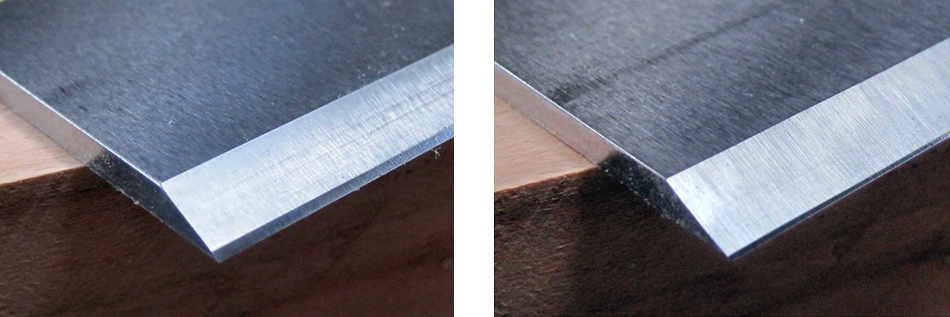
After multiple honings the micro-bevel will get too large and it’s time to regrind the primary bevel and rehone the micro-bevel. I begin by regrinding the primary bevel at 25° getting as close to the edge as possible without actually touching it. There are couple of ways to do this. One easy way is to put the blade into the honing guide, set it for a 25° bevel, then grind almost to the edge using a very coarse stone (a 120 grit diamond stone works well) or coarse sandpaper on a flat surface. This method is simple and accurate but can be time consuming. The other option is to hollow grind the 25° primary bevel on the grinder, again getting close to the edge but not quite touching it. If you are pretty good at the grinder this option works very well and is faster. Fine Woodworking has an excellent article on using the grinder from the May 2008 issue: Grind Perfect Edges Without Burning by Joel Moskowitz. It’s available on-line to members only here. Once I have reground the primary 25° bevel I can go back and hone a 35° micro-bevel as described above. On the left is a blade with a flat 25° primary bevel. The micro-bevel on this blade is getting large, so the primary bevel will need to be reground soon. On the right is a blade with a hollow ground primary bevel at 25° and a small 35° micro-bevel.
Card scrapers
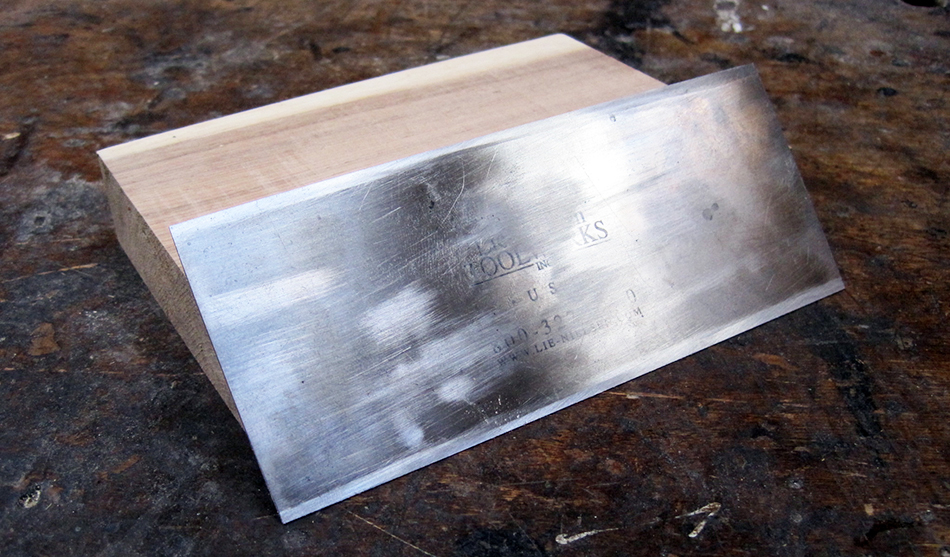
Of all the tools that students come to class with, the card scraper seems to be the most misunderstood. Once I show my students how to properly sharpen a card scraper they are usually amazed at the fine shavings they get compared to the dust they are accustomed to. This tool does an excellent job at removing the fine facets left by the spokeshave and is also great at removing tear-out. Probably the most common mistake my students make when sharpening a scraper is to turn too heavy a burr. Brian has a couple of very good videos on the Fine Woodworking web site. The first shows how to sharpen a scraper and the second how to use a scraper. These videos do not require an on-line membership and I highly recommend them. There is another video on the site by a Fine Woodworking editor that demonstrates a variation on Brian’s method of sharpening a scraper. Brian’s method relies on using your fingers to apply pressure to the scraper while honing the edge. I always had problems with this, and honing took a very long time. The variation uses a wooden block to apply pressure while honing the edge. For me the difference was like night and day. Once I started using the block while honing I was able to hone edge to edge very quickly. Here is one of my well-used Lie-Nielsen scrapers. You can tell the honed edges by their lighter color.
Shavehorse
The shavehorse is a wonderful tool for holding chair parts while you work. Brian has designed a version of the traditional horse that does a great job of holding parts and allows for very quick adjustment to accommodate parts of different thickness via a ratchet mechanism in the lower jaw. You can read about this horse and see plans for building one in an article from the November 1999 issue of Fine Woodworking, A New Breed of Shaving Horse, also available on-line to members. In the article Brian recommends that individuals adjust the dimensions of the horse to fit their build, although in reality most people simply follow the dimensions in the article. I bought a Lie-Nielsen horse when they first came out and used it for many years. When I started teaching classes I needed a second horse and decided to duplicate the Boggs / Lie-Nielsen that I already owned. At about that time Pete Galbert suggested a few changes to the horse design in this blog post. One of his suggestions was to reduce the angle of the lower jaw from 18° to 10°. Since I was building a new horse I decided to give it a try and have found that I prefer the lower angle because, for me, it puts the work at a more comfortable angle. On the left is the Lie-Nielsen horse, and on the right is my variation with the lower jaw angle. I think Pete was a bit hesitant to suggest changes to Brian’s design, but Brian had a very thoughtful and gracious response which gives a lot of insight into the thinking that went into designing his shavehorse. You can read Brian’s response in this blog post.

Here is a shot of the Boggs designed Lie-Nielsen shavehorse.

And here is the shave horse I built based on the Lie-Nielsen. In addition to reducing the angle of the lower jaw, I also changed the shape of the seat. A while back I built a Perch stool, designed by Pete Galbert and really liked the comfort of the seat. I used the same seat, raised slightly in the back as it is in the stool, for this horse.

There are a couple of other options that I know of for shaving horse designs and plans. Country Workshops sells plans and a fully assembled shaving horse. I have a couple of friends who have built this horse and like it. It is similar to Brian’s design in that it uses a ratchet to raise and lower the lower jaw and the front is cut off to allow for clearance when working on large curved chair parts. The detailed plans include a cut list, parts list, lots of drawings, and thorough step-by-step instructions. The main body of this horse can be made from a single 2 x 10 x 10.

Finally, Pete Galbert has a new design called a Smarthead Shaving Horse. He has completely redesigned the clamping head which now has an internal ratchet. This horse design solved a lot problems for the way he works, which is primarily shaping Windsor chair parts. I asked Pete whether he thought this horse would work when shaping ladderback chair parts which typically include larger parts than is common in the Windsors, particularly the rear legs for side chairs or rockers which can be more than 48″ long. Having never worked ladderback chair parts on the smarthead he thinks it would work fine for ladderbacks, but can’t guarantee that some issue would arise. If anyone has used the smarthead shavehorse for working ladderback chair parts I’d love to hear about your experience. There are plans and lots of information on this shavehorse at Pete’s blog. You can also find plans and a step-by-step tutorial on the Benchcrafted Blog showing how to build the version of the smarthead shavehorse on left. The photo on the right shows an early version of the smarthead mechanism and treadle grafted onto a Boggs-style frame. For ladderback chairs I would consider having the front of the horse extend beyond the smarthead as little as possible to provide clearance for working on long curved parts, as in the horse on the right.

No horse, no problem
If you do not own a shavehorse or haven’t had the time to build one or the money to buy one, don’t let that deter you from working on a chair. A vice is a perfectly acceptable method of holding chair parts while shaping with drawknife and spokeshave. In fact there are some chairmakers who prefer a vice. Brian told me a story about a class he taught in England. The school did not have any shavehorses so all the students used a vice to hold parts. Brian said he was disappointed in how little difference it seemed to make.
In my next post I’ll describe how to use the drawknife, spokeshave, and scraper to transform a square blank into a beautifully rounded and tapered front leg.
Side Chair Build Series Links:
- Next Post: Hand Shaping, Part 2 — Front Legs
- Previous Post: Fitting Slats, Part 4