If you remember from the post on milling blank parts, I cut the slat blank from clear, quarter sawn stock. It is about 4-1/2″ wide x 22″ long x 9/4 thick. Here is the rough blank.

The first step is to face joint one face, then edge joint one edge 90° to the jointed face. I also like to put a triangle on the edge so that I can keep the slats in order. Here is the milled blank ready to resaw.

My goal is to get four blanks—I only need three in the chair but I generally like to bend an extra one as a backup (sometimes even very small knots will put a kink in the slat while bending). This blank is roughly 2″ thick after jointing which will easily yield the four rough blanks, and probably five. If I am not concerned about getting the maximum number of slats from a blank I can simply set the band saw fence at 3/8″ or a little more. However, if I want to maximize the number of slats I can get from a blank I need to set up the fence for a more accurate cut. Brian can get 6 slats from a 9/4 board which makes one set of rocker slats or two sets of side chair slats. Especially if there is a distinctive grain pattern, it is nice to have all the slats from the same board in the order they were cut.
I will be cutting the slat mortises with a router which means the mortises will have a very consistent width of .250″ (1/4″), so I will mill the slat blanks to .270″ thick, enough extra width to fit the tenon precisely to the mortise. If you are hand chopping your mortises, depending on your skill level, the slat mortises may vary in width. In that case it is a good idea to mill the slat blanks a bit heavier, say .300″ thick, to allow for any variations in the width of the hand chopped mortises. Another issue to consider when thinking about what thickness to mill the slats to is the moisture content of the wood. For wood with a moisture content of between 12% and 20%, the above recommended thicknesses are fine. If the wood is much above 20% I will add .020" to .030" to the final milled thickness to compensate for the anticipated additional shrinkage when drying.
I generally like to resaw the blanks about .080″ thicker than the final slat width. If your band saw cuts very smoothly and accurately you can reduce that to about .060″ thicker. In this case I want my final slat blank to be .270″ thick, so I am aiming for a rough slat of about .350″ thick. Using a ruler I set up the fence as accurately as possible and then do a test cut. I use a small piece of scrap that is milled square on two sides (cut offs from prepping the rear legs work well for this). I draw a line on the scrap so I know the direction that the cut is made as shown on the left, then run the stock a short distance through the blade, pull it back out, and clip off the test cut to measure as shown on the right. If the width is off I manually readjust the fence, trim the test stock, and make another test cut. My second test cut measures almost exactly .350″, so I am ready to resaw.

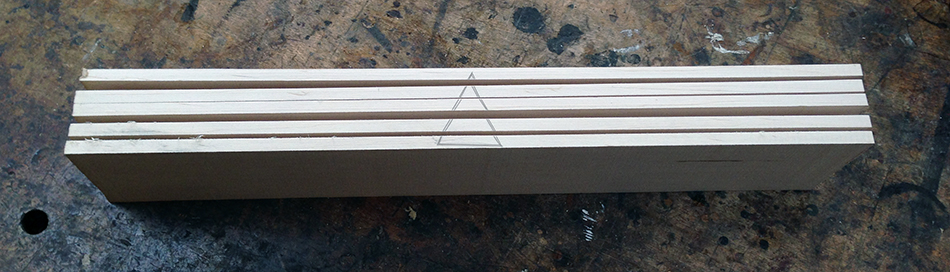
I resaw each slat carefully and slowly. If the saw is cutting well there is no need to face joint between cuts. I stack the slats in the same order as they were cut as shown here.
Next I thickness plane the slats to final width. I take small cuts, moving the planer head down 1/4 turn after each pass (1/64″). I pay careful attention to the quality of the cut. If it looks like I am getting tear-out I rotate the blanks end-for-end before taking another cut. It usually takes about two or three passes on the first side to remove all the band saw marks. Then I flip the slats over end-for-end and take another two or three cuts. At this point I measure the thickness after each pass and stop when the slats reach their final thickness, which in this case is .270″.

Here are the five slats laid out in the order that they were cut. Sometimes the slats will have a distinctive grain pattern. In that case I may want to preserve the cut order so that the similarity in grain pattern can be seen from one slat to the next. In this case the maple slats have a very consistent grain pattern so that is not an issue. But they do have small areas of staining which I would like to end up in a similar area on each slat.

Because the grain pattern is so consistent I am at liberty to flip some slats over in order to move the area of staining. I also need to trim the length of the blanks from about 22″ to the final length of 20″. I can influence the location of the staining by trimming off the excess from one side or the other. Here are my choices for the four slats I will bend. The top slat has no staining at all, and the bottom three have staining in similar positions. To ensure that these slats are bent with this face down on the form I put a pencil mark on the left edge of each blank. This will help me orient the slat correctly when bending.

Here are four slats in a rack ready to be put in the steam box.

In the next post I’ll demonstrate how to steam bend these slats.
Side Chair Build Series Links:
- Next Post: Bending the Slats
- Previous Post: Steam Bending, Part 2 — Bending the Rear Legs