
My favorite part of building the Boggs side chair is shaping the rear legs. The round legs from the seat level down, the sensuous soft curves of the bend, and the tapered half round of the back above the seat contrast beautifully with the sharp edge of the relief cut and front edges of the leg above the seat. Shaping the rear legs is very pleasant work and immensely satisfying. The result are two rear legs that become a key element of the rear panel that makes this chair so distinctive and comfortable.
The process of shaping the rear legs is very similar to that of shaping the front legs so it would be a good idea to review the detailed description of shaping the front legs in the last post. In fact, from the seat level down, the rear legs are identical to the front legs. The differences begin above the seat with the relief cut and the tapered half round back. Here are a pair of rear legs that are ready for hand shaping.

I begin shaping by laying out the facets on the bottom part of the leg from the relief cut down. This is identical to the process used in the front legs. Here is the bottom of one leg laid out with an equilateral octagon.
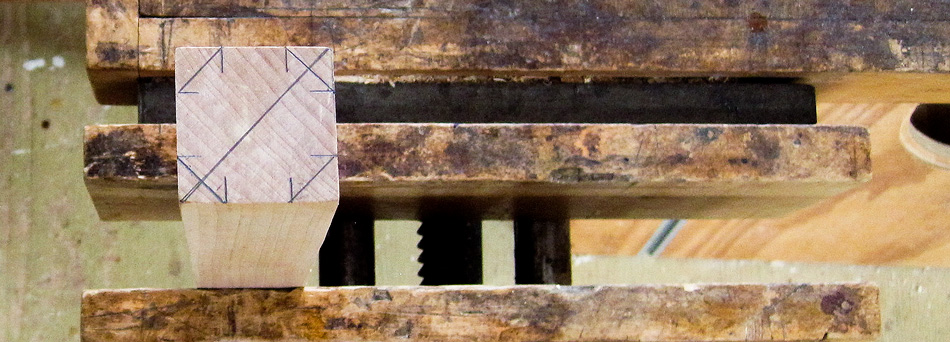
As with the front legs, the facets of the octagon are drawn down the length of the bottom half of the rear leg.

From the relief cut and above, the octagonal facets are only cut on the back of the leg. And each facet is tapered as the legs narrows from 1-5/8″ square at the relief cut to 1" square at the top. I begin by laying out the curved, tapered facet on each side of the leg. First, I make a mark on one side 5/16″ from the top, back corner of the leg. Next, using the opposite leg as template, I draw a line connecting the facet on the lower part of the leg to the 5/16″ mark.

Here is one side of the rear leg laid out and ready to be shaped to an octagon.

Next I lay out the facets on the upper part of the back of the leg. I begin by marking 5/16″ from both top corners as shown on the right side of this photo.
Then I connect each facet drawn on the lower part of the leg with it’s corresponding 5/16" mark at the top of the leg. An easy way to do this is to use a thin, flexible strip of wood as a guide.

Here is the back of the leg laid out.

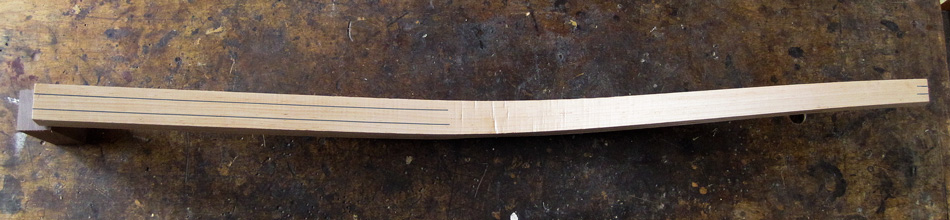
Finally I draw a line across the width of the leg at the point where the relief cut begins. Next I draw another line 2-1/2″ above the first line to mark the end of the relief cut. Be sure to lay out both legs before beginning to shape since the opposite leg is needed as a template for drawing the facets on the side. This leg has all the layout lines and is ready to shape.

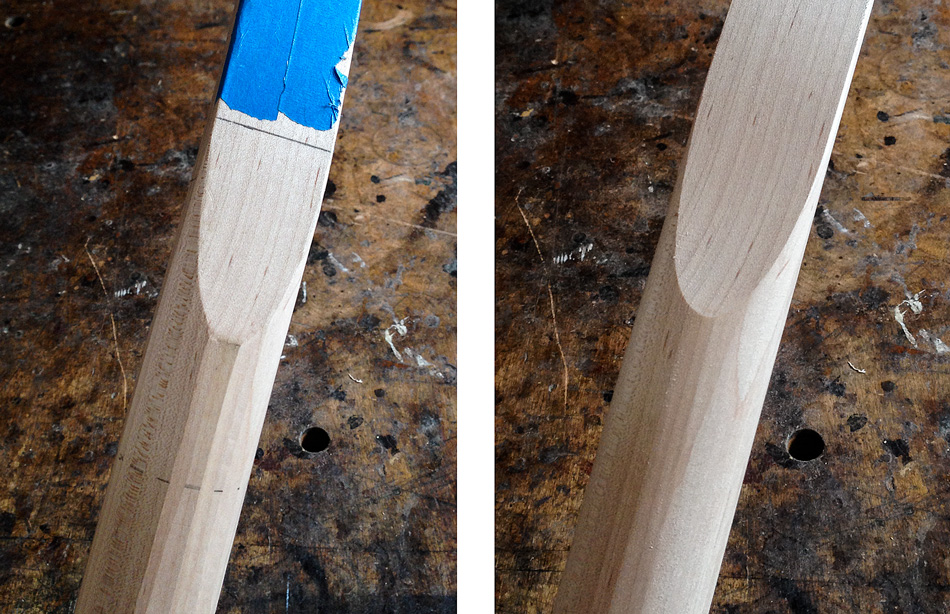
There is one more thing I have my students do before shaping. The front edges of the leg above the relief cut do not get cut. For students who are unfamiliar with the shape of these legs it would be easy to mistakenly cut into these edges (I’ve seen it happen). To avoid this I have them put blue tape on the front of the leg and overlapping slightly onto both sides. This is a signal not to cut into these edges.

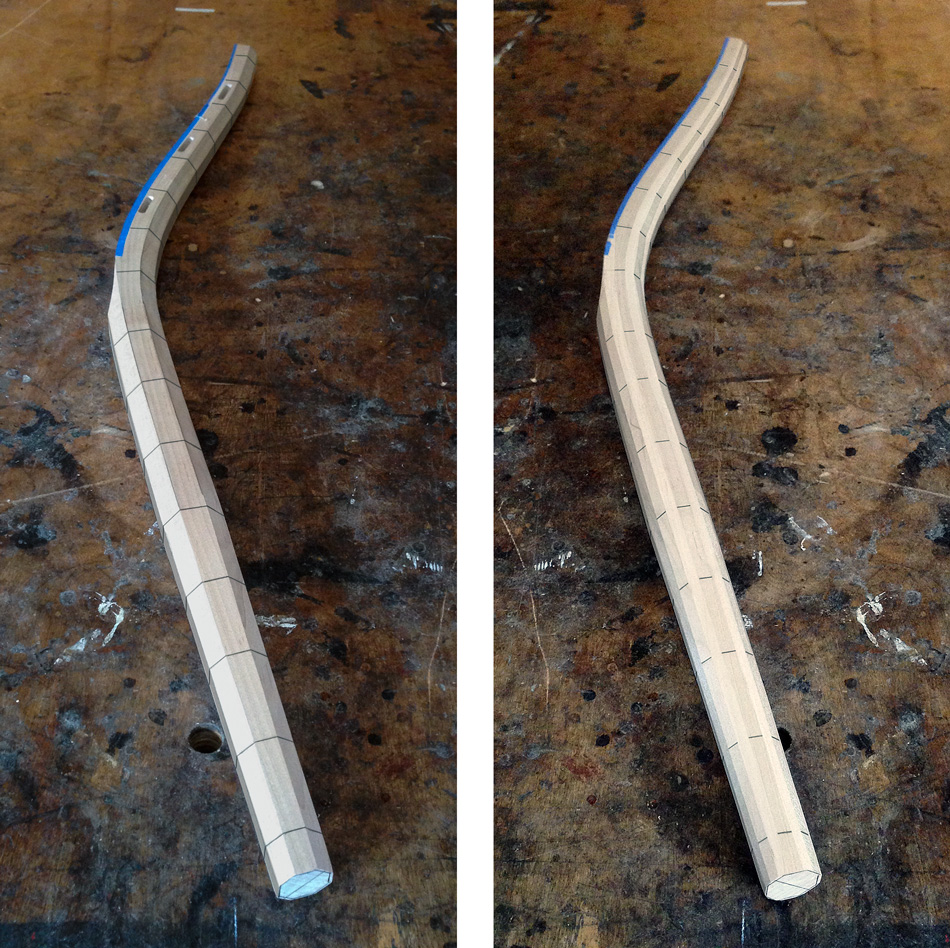
I begin shaping by cutting the facets for an octagon on the entire leg. As with the front legs, I rough out the facets with a drawknife and finish them with a spokeshave. From the relief cut down to the bottom of the leg the shaping is identical to the front legs — a full 8-sided octagon. On the front of the leg, beginning at the relief cut, the two facets taper until they reach the line 2-1/2″ above the relief cut. On the back the facets curve around the inside of the bend and taper as they move to the top of the leg. To make the curved cuts inside the bend I use a drawknife with the bevel down. For finishing the inside curved cuts I use a round bottom spokeshave. Even though the facets are curved and tapered they should still be flat side-to-side. Here are views from the top and side of a leg shaped to an octagon.

On the left is another view of the leg shaped to an octagon. The next step is to shape the taper at the bottom of the leg. The process for this is identical to shaping the taper on the front legs. On the right is the leg completely shaped to an octagon, including the taper at the bottom.

The shaping continues in the same manner as it did with the front legs. Before shaping to 16 sides I draw reference lines around the leg two or three inches apart. From the relief cut up to the top of the leg the reference lines are only on the back and sides. As I move from 8 sides to 16 sides it gets more difficult to see the facets. The reference lines help me visualize each facet and also compare the width of each facet to the others. The leg in the photo on the left is ready to shape to 16 sides. In the photo on the right the leg has been shaped to 16 sides — when the dashes and gaps in the reference lines are equal the facets are equal in width.
Next, after renewing the reference lines, I shape the leg to 32 sides as shown on the left. And finally I shape the leg to fully round from the relief cut down, and half round from the relief cut to the top of the leg as shown on the right.

Shaping the relief cut can be particularly challenging for someone who hasn’t done it before. On the left you can see the relief cut at the octagon stage. The curved shape is a result of a full octagon intersecting with the scoop of the relief cut on the front of the leg. If you look carefully you’ll see that the facets that intersect with the relief cut are flat side-to-side. This is an important concept, as most people want to make the facets crowned or rounded side-to-side. On the right the leg is shaped to 16 sides. Again, each facet is flat side-to-side and you can see that the ellipsis shape of the relief cut is becoming smoother because there are more facets.

As I shape the leg to 32 sides the curve of the relief cut becomes smoother still as you can see on the left. And finally, in the fully round leg, the relief cut is a smooth, continuous, curved ellipsis. It’s nice to keep a sharp edge on the intersection between the round leg and the scooped relief cut. This sharp edge contrasts nicely with the smooth curves of the leg.
The only shaping left to do on the rear legs are the ears at the top of the legs. I will wait until after I drill the rear rung mortises to do this. The process for drilling the rear rung mortises uses the back of the rear legs as a reference, so I want to keep them as consistent as possible until after the rear rung mortises are drilled.
In the next post I’ll describe the process for the final shaping of the slats.
Side Chair Build Series Links:
- Next Post: Hand Shaping, Part 4 — Slats
- Previous Post: Hand Shaping, Part 2 — Front Legs