For many woodworkers new to chairmaking, especially if their previous experience depended on “straight, flat, and square,” calculating and drilling angled mortises into round, curved parts can seem like magic. Over the years Brian has developed some very simple and accurate methods for drilling rung mortises without ever knowing the actual drilling angle.
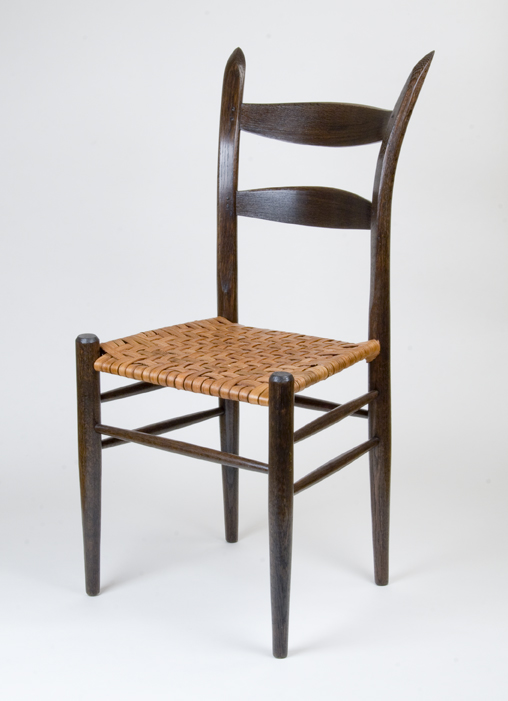
The chair shown here employs a very simple form of ladderback construction. Although most of the parts are round, the only parts of the chair that are curved are the rear legs above the seat and the slats. From the level of the seat and below, the legs go straight down without any splay.
When viewed in cross section the rungs form a trapezoid with one leg at each corner as shown in the illustration below. The front and rear rungs are parallel to each other and the side rungs angle in toward the rear legs an equal amount. The first question many woodworkers have is how to measure the angle of the side rung relative to front leg or rear leg. The answer is don’t measure the angle. Rather measure the distance needed to raise the front or rear panel so that a drill bit held at 90° to the table top will drill the mortise at the correct angle. This method is a variation of a technique used by carpenters to calculate stair case dimensions called rise and run.

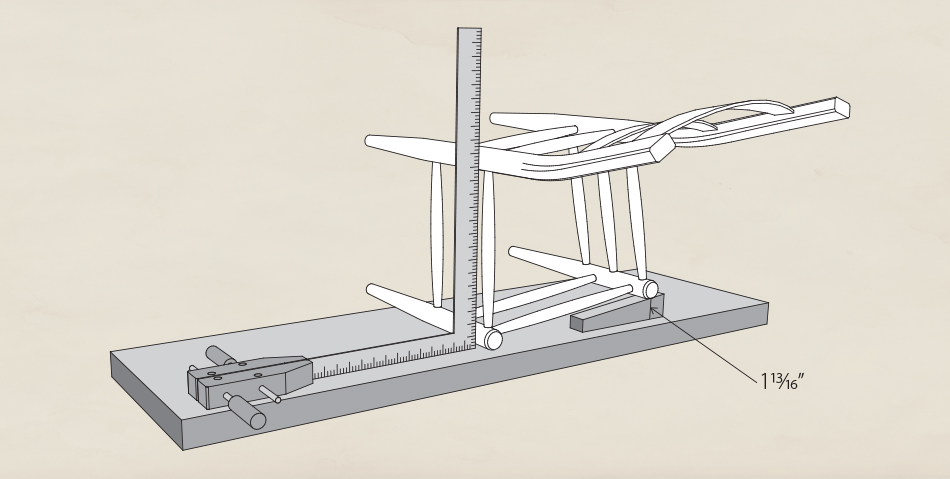
If you have an assembled chair it is easy to measure the rise and run. For drilling into the front legs, place the chair on a flat surface with the front legs down. Place a framing square next to one side of the chair and, using a large wedge, lift the opposite side up until both legs on the first side touch the framing square as shown below. With the chair in this position the rung connecting the front and rear legs will be at a 90° angle relative to the table top (as will the drill bit in the drill press). Measure the distance the raised front leg is above the table top. For this chair it is 1-13/16″. This will be the height to make a riser block to raise the assembled front panel when drilling for the side rung mortises in the front legs.
Measuring the rise and run for drilling into the rear legs is done in a similar manner. Place the chair on a flat surface with the rear legs down and the top of the chair hanging off one side of the table. Place a framing square next to one side of the chair and, using a large wedge, lift that side of the chair until both legs touch the framing square as shown below. With the chair in this position the rung connecting the rear and front legs will be at a 90° angle relative to the table top. Measure the distance the raised rear leg is above the table top. For this chair it is 1-1/2″. This will be the height to make a riser block to raise the rear panel when drilling for the side rung mortises into the rear legs.

Below is a cross section showing the rear panel on it’s riser block superimposed in front of the front panel on it’s riser block. You’ll immediately notice that the angle of both panels relative to the table top is identical. If the angles are identical, why are the riser blocks different heights? The answer is that the runs are different. A longer run for the front panel requires a taller riser block, even though the angle of the panel relative to the table top is identical to that of the rear panel. This is the essence of rise and run.

For me the beauty of rise and run is it’s simplicity and accuracy. In it’s simplest form the only jigs needed for drilling the correct side rung mortises in a ladderback chair with no splay in the legs are two blocks of wood that are the correct height. These blocks are remarkably accurate because the measurement for their height is taken at the end of the run for each panel, far away from the vertex of the angle the panel makes with the table top. A small difference in the height of the block will have very little effect on the actual drilling angle. Although we strive for accuracy, the rungs and legs in ladderback chairs are very flexible and can easily accommodate small inaccuracies. Another bonus of the rise and run method is that the jigs are very easy to make, very easy to use, and very compact and easy to store.
Although the rise and run method is very simple in theory and practice, it is often hard to explain and understand. If you have any questions put them in the comments section of this post. In the next post I’ll describe how to calculate rise and run if you don’t have an existing chair to measure. And I’ll show you a simple, foolproof jig for drilling the side rung mortises in this chair.
Related post: Angles, Part 2