Updated April 5, 2020
Once I have all the rough blanks for the chair milled I am ready to prepare the rear legs for steam bending. As with most things in the process of building this chair there is more to it than simply cutting the parts to specific dimensions. You may recall when I milled the rough blanks for the rear legs I was looking for pairs of legs with straight long grain and matching rift sawn end grain. In taking the legs from a rough blank with those characteristics to a finished pair of legs ready-to-bend, I am primarily concerned with finding the optimal grain orientation (both end grain and long grain) for the pair. A secondary concern is to mill out or minimize defects, if any, in the blank.
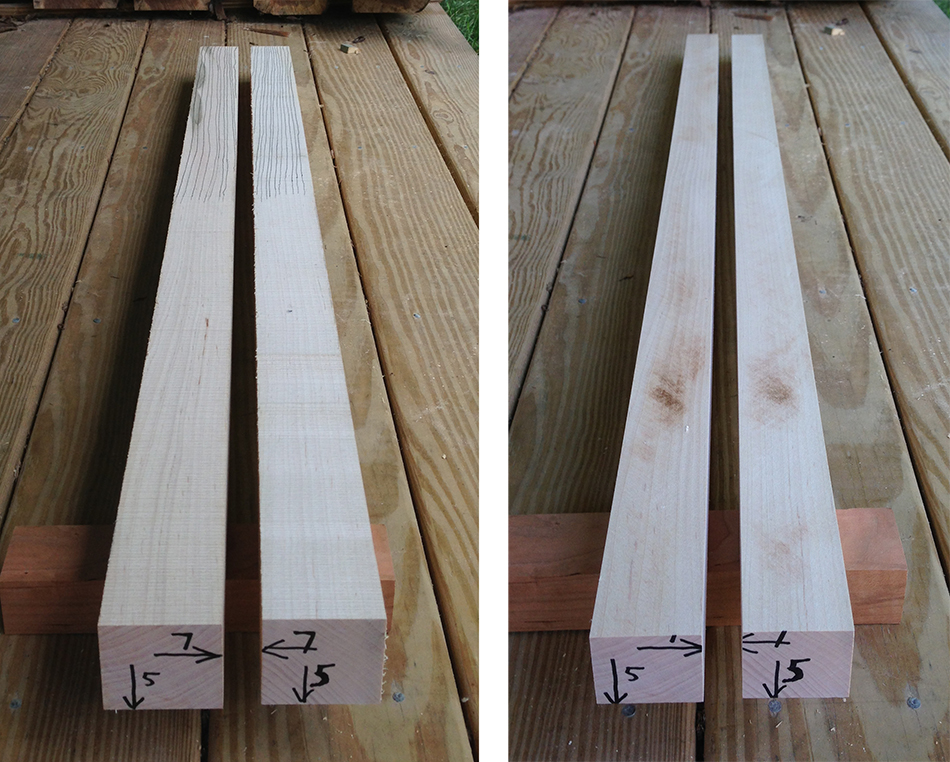
Orienting the end grain of the legs so that it is rift sawn is done to make the best possible leg to rung joint. In my second post on grain orientation I explained that when you add the angle of the rift sawn end grain to the angle that the legs are rotated by the slats during assembly the result is end grain that is roughly 45° relative to the long grain of the rungs, which makes for a good leg to rung joint. Pictured below, on the left, are a pair of legs from the rift sawn board. The end grain on these blanks have an angle greater than 45°, so the simple solution to make them rift sawn is to rotate each leg 90°. Pictured on the right is the result. Ideally the rift sawn end grain in each leg will be a mirror image of the other, as it is here.

Orienting the long grain at the top front face of each leg is done for aesthetic purposes. The object is to have the long grain mirror or complement the physical angle of the legs themselves. The rear legs are further apart at the top and closer together where they meet the seat, so, when viewed from the front, the legs angle toward the center of the chair. I want the long grain in each leg to also angle towards the center of the chair. Grain that is parallel to the length of the leg is also a good option. Each blank has four potential top front faces. To find the combination that works best I move the blanks to various positions relative to each other and choose the combination works the best. In the photo below, left, I have highlighted the long grain with pencil to make it easier to see. The top two feet of these blanks has long grain that angles slighty toward the center which is what I am after. The photo on the right shows my final choice for orientating these two blanks—rift sawn end grain that is a mirror image on both blanks and long grain on the top front face that angles slightly towards the center.

Other considerations, beyond grain orientation, include identifying any defects, which can include small knots, grain runout, and in this case, staining. Anticipating the upcoming steps in transforming these blanks to finished legs I can use the milling and shaping process to minimize or eliminate defects. For instance, in the blank on the left, there is staining on the top, front face that I don’t want to appear in the final leg. The staining penetrates the blank about half an inch. There are several things I can do about this. First, the blank is roughly 2-1/4″ square and the final thickness, front-to-back is 1-5/8″, so I know I can mill almost half an inch of material from front face. If that is not enough, I also know that the top front face has a taper cut into it, removing even more material. I can also use the fact that I will be trimming the blank to length (from about 48″ to 45-3/16″) to affect the location of a defect by trimming mostly from the top or mostly from the bottom. Additionally, after bending, I will trim about 3″ from the top of the leg and about 1" from the bottom so I know that any defect in these sections will be removed.
Once I have made all the choices regarding the orientation of each blank I am ready to begin milling. The blanks are roughly 2-1/4″ square in cross section. The final milled dimensions are 1-5/8″ front-to-back and 1-7/8″ side-to-side. The side-to-side dimension is 1/4″ wider than the final dimension of the leg—bending often introduces some twist into the blank and this extra width will allow me, after the blank is bent and dried, to joint one edge flat and thickness to 1-5/8″. To make it easier to keep track of which dimension is which I label each blank with an arrow and a “5” (for the 1-5/8″ dimension) and an arrow and a “7” (for the 1-7/8″ dimension) as shown below on the left. I also point the arrow toward the face that I want to joint. I begin by face jointing the sides identified by the arrow and “5”. Next I edge joint the sides identified by the arrow and “7”. These become my two reference edges. At this point there are couple of different ways to mill to final size, depending on the equipment you have available. One way is to rough mill the blanks to about 1/8″ oversize in both dimensions on the bandsaw (keeping the reference edges against the fence and the table when cutting) and then mill to final dimensions on the thickness planer. A second way is to mill to final dimensions on the table saw, again being sure to always have the reference edges against the fence and the table. Pictured on the right are the blanks milled to final dimension. By taking most of the material from the front face I completely eliminated the staining on the left blank. There was also some light staining on the sides of each blank so I was careful to mill in a way that removed all of it.
The next step is to trim the blanks to length (45-3/16″). This is my final opportunity to affect the location of any defects. In this case, having no defects to consider, I simply squared up the tops and trimmed to length by cutting from the bottom.
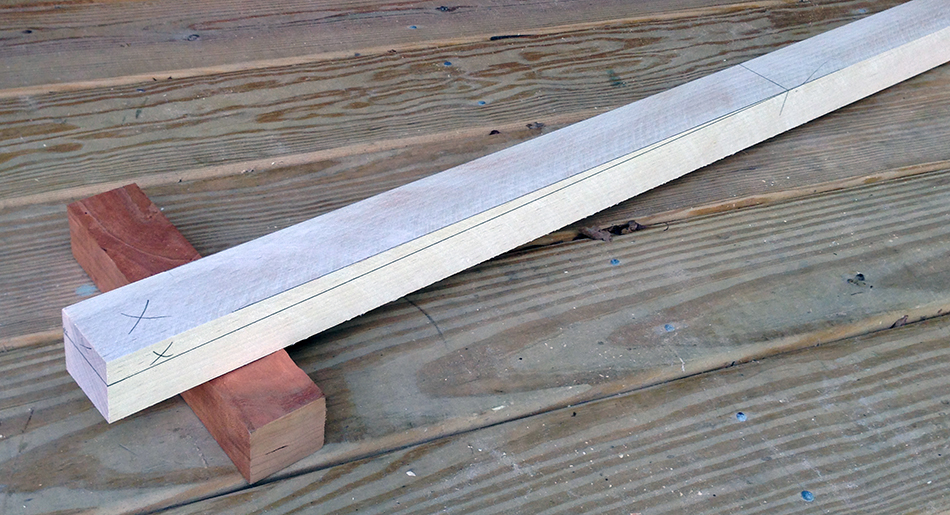
Finally I will cut a taper into the front face at the top of each blank. I begin by laying out the cut. Even though I will make this cut on a taper jig, I always lay it out completely to ensure that I put the blank in the jig correctly. The first mark is 22″ from the top on the front face (upper right in the photo below). The second mark is 1″ from the back face on both sides of the blank. Next I connect the marks as pictured. The result will be a 5/8″ x 22″ taper milled off the top, front face of the blank. I always save the cutoffs—the long, thin wedges often come in handy.
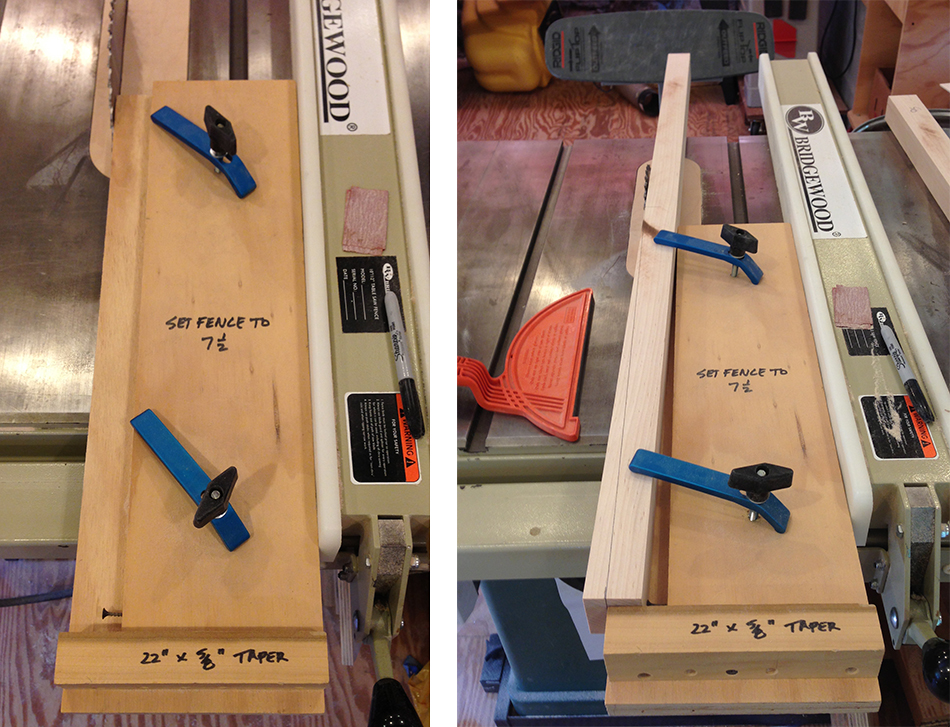
Here are a couple of shots of my dedicated table saw taper jig. It only cuts 5/8″ x 22″ tapers which are used in both the side chair rear legs as well as the rocker rear legs. There is a long base that is 7-1/2″ wide. Attached to the base is a fence 22″ long and 1-5/8″ from the left side of the base. Toward the bottom of this fence is a screw that projects 5/8″ from the fence and a stop to capture the blank. And there are two hold-downs to secure the blank tightly in place. Pictured at right is the blank in the jig ready to be cut with the layout lines showing the off cut. I very carefully make the cut using a push stick along with outfeed support beyond the table to support the leg as the cut is made. There are many other ways to make this taper cut depending on the equipment you have available and your comfort with particular processes. The easiest is to rough cut the taper using a bandsaw, then clean it up smooth and flat with a handplane. There are also scary and non-scary ways to make this cut on jointer. And, finally the entire cut can be made with a drawknife and spokeshave if you would prefer using hand tools. I chose the table saw taper jig because it is fast, accurate, safe, and I have proper equipment.
The final blanks, ready for the steam box, are pictured below. On the left I’ve turned the blanks on their side to reveal the profile of the taper cut. On the right I’ve highlighted in pencil the rift sawn end grain at the bottom, and the long grain on the front face of the taper cut. The taper cut altered the angle of the long grain slightly, giving it a more pronounced angle towards the center, which I really like. I also labeled the bottom front face with the word “UP”. I put the legs in the steam box with the front face up and I also put the front, tapered face up in the bending form. Even with the taper it is difficult to distinguish front from back (especially when I am moving quickly to bend the leg) so this simple label helps me get the orientation of the leg correctly in the bending form. All-in-all, two near-perfect rear leg blanks. Although this explanation is quite lengthy, the actual process of milling ready-for-steaming legs blanks from rough blanks goes very quickly.

In my next post I’ll describe my steam box setup and bending form. Stay tuned.
Jeff Lefkowitz
Side Chair Build Series Links:
Next Post: Steam Bending, Part 1 — A Simple Steam Bending Set-up
Previous Post: Milling Blank Parts, Part 2 — Slats, Front Legs, and Rungs